Dolphin Management Integration Setup
Dolphin Management (version 8) sends encrypted email — x-rays, referrals, images, and patient, billing, or doctor information — through the Send It Secure encrypted SMTP gateway. Recipients get a secure notification, verify their identity per your policy, and view the message and attachments.
Before you start
1Get your Access Credential. In Send It Secure, create an API & SMTP access credential — it gives you an Access ID (user name) and Access Key (password). Keep them handy.
2Make sure each Dolphin user who will send has an email address associated with that account.
Step 1 — Enter the SMTP settings in Dolphin Management
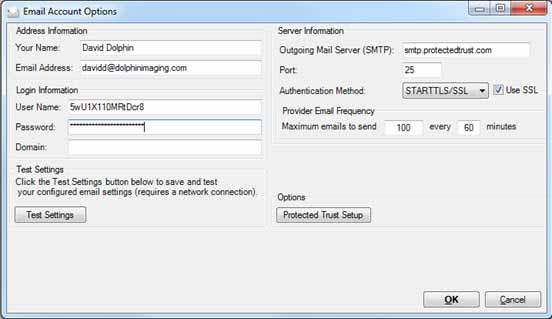
1In Dolphin Management, open Tools > SMS/Email Manager, then choose Email Options.
2Under Address Information, enter your name and email address.
3Under Login Information, enter your Access ID as the User Name and your Access Key as the Password.
4Under Server Information, enter the settings below. Setting the Outgoing Mail Server (SMTP) to smtp.protectedtrust.com makes the Protected Trust Setup button appear.
5Check Use SSL, then click Protected Trust Setup to continue.
| Setting | Value |
|---|---|
| Outgoing Mail Server (SMTP) | smtp.protectedtrust.com |
| Port | 587 |
| Authentication Method | STARTTLS / SSL |
| Use SSL | Checked |
| User Name | Your Access ID |
| Password | Your Access Key |
Step 2 — Choose whose policies apply
The first time you save, a Protected Trust Policy reminder appears. Confirm that your Send It Secure account's first Message Policy is Required Registration and the Unregistered Recipient Identity Verification options are set. Then:
AClick OK to use the Message Policies defined in your Send It Secure account, or
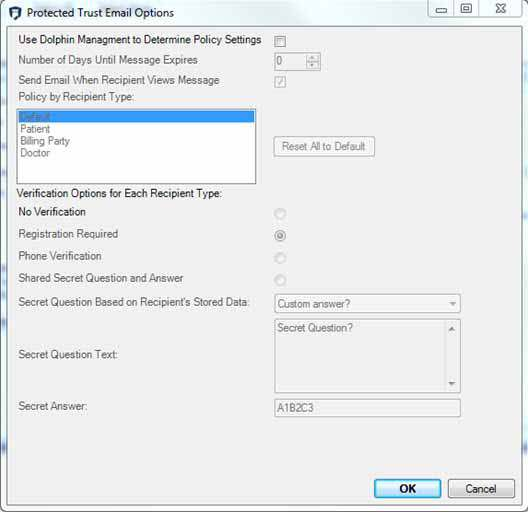
BCheck Use Dolphin Management to Determine Policy Settings to set the policies in Dolphin instead (these override your Send It Secure policies when sending from Dolphin).
Step 3 — Set Message Policies by recipient type
If you chose to manage policies in Dolphin, set how each recipient type must verify before opening: Default, Patient, Billing Party, and Doctor. A Default policy is required. The verification options are:
No Verification
The email recipient can click a link and read the secure email without having to verify their identity.
Registration Required
The email recipient must sign up with Protected Trust to view the secure email. This is the setting Dolphin Management uses if you do not specify a different option.
Phone Verification
The email recipient receives a one-time code by call or text and enters it to view the secure email.
Shared Secret Question and Answer
The practice provides the email recipient with a question and answer they can use to verify their identity. When you select this option, the next three options become active:
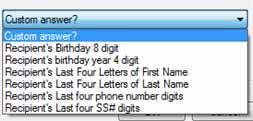
- Secret Question Based on Recipient's Stored Data — the only option available is Custom answer.
- Secret Question Text — enter the text that prompts the recipient to enter the secret answer.
- Secret Answer — enter the secret answer (minimum of 4 characters).
Step 4 — Send a secure message
1Set the Mail Method to “with Secure Attachments via Protected Trust.”
2Right-click a patient's email and choose Send Message. The message and attachments are encrypted and delivered securely.
What the recipient sees
The recipient receives a notification with a link, verifies per the policy you set (answer, phone code, or sign in / register), and then views the message and attachments. Because each message carries its own verification rules, changing your policies later only affects new messages.
Full manual & troubleshooting
For the complete walkthrough with screenshots, see Dolphin's Dolphin Management & Send It Secure Integration Manual.